Showing posts with label product corner. Show all posts

Friday, May 31, 2013

Product Corner: Ice cream makers

It's ice cream season in my house (betcha couldn't tell!) and I wanted to talk about ice cream makers, since I think the topic can seem a little daunting if you've not delved into making ice cream before.

The long and short of it is, there are 2 basic kinds of ice cream makers (not counting the old-fashioned kind that required rock salt and a front porch to churn on...): the kind with the cooler-lined cannister that you freeze, and the kind that has it's own cooling unit (condenser...sort of like your air conditioner) built right in.

Most ice cream recipe books will say that either is fine, and they're not wrong... mostly.

Here's the real scoop (ha ha! see what I did there?):

Cannister-type ice cream makers require you to freeze an inner liner, that looks like an ice bucket, until it's good and solid-- usually 24-48hrs before you use it.  Then, the other part of the machine will turn the frozen cannister, and there will be a paddle-like scraper/agitator attachment that will turn, churn, and aerate the mix as it freezes.  You usually can only use the cannister once, before you need to re-freeze it (I've tried making 2 batches in a row, and it didn't work in mine). 
Some of these are stand alone models (Cuisinart makes a very trusty one) and some are sold as an attachment for your stand mixer (samples of each below).


I used a Cuisinart version for years, and it was ok.  Good.  Definitely better than trying to, say, freeze ice cube trays of cream and then blend them-- that's just nuts.

This is the newest model of the trusty Cuisinart ice cream/yogurt maker. Mine's a bit older but basically the same.
The issue at hand is, how quickly the mixture freezes, which controls the size of the ice crystals, and the amount of air that gets mixed in.  Smaller crystals means a smoother ice cream, and some air, but not too much, will make the ice cream seem dense and lush, whereas too much air will make the ice cream seem fluffy and weird (the amount of air is call overrun, and is the difference between premium and non-premium ice cream you buy at the grocery store).  You want some air, but not a foamy mess.

So, the cannister style ice cream maker takes longer to freeze the ice cream (and you really need to start with VERY cold mix, so that you don't waste precious time of the cannister melting), and I found there to be a lot of inconsistency-- as you poured out a rather soupy soft-serve consistency ice cream, you would still have to really scrape the sides (risking scratching the "non-stick coating" on the surface) and there, the ice cream was rock hard.  Mixing everything quickly in a container and throwing it in the freezer for several hours, you would get a pretty good product in the end.  But I was stressed out and wanted the process to be easier and better.

After about 6 years of using my cannister-style, I invested last year in a not-too-expensive-if-you're-really-going-to-use-it-a-lot model of self-cooling ice cream maker.  It got good reviews all over, and I'm really happy with it (it's does beep weirdly, but maybe mine just got bumped in transit... works fine though).
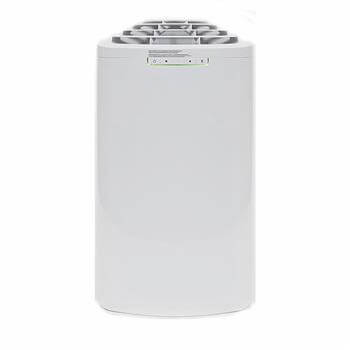
This is my current model. Whynter (and others) make bigger, more expensive models, but this one works just great.


The difference for me is: I don't have to perfectly chill my ingredients first (I'm not putting hot liquid in it, but from-the-fridge-to-the-blender-to-the-machine works just fine); it also creates firmer ice cream right off the bat.  I can stop it early, get the soupy soft-serve (which my husband actually likes...) or I can let it run longer, because there's no cannister that will melt and stop my progress.  And, I can make as many batches as I want in a day, or day after day.  Lastly, I don't have to give up precious room in my freezer for the cannister-- that room is MUCH better used by additional flavors of homemade ice cream!

So-- if you're just dabbing your toe in the ice cream pool (ooooooh... a pool of ice cream... with ice cream sandwiches as the floaties in the pool... yummmm), then by all means, pick up the cannister type, and see if you like making ice cream, if your family eats enough of it, and if it winds up on the yard sale table within a year or two.

If you're really committed, then I can definitely recommend you find yourself a model with a built in cooler (Whynter makes the above model and a bigger one, and Cuisinart makes a similarly priced model as well).

Happy Freezing!

Thursday, May 23, 2013

Product Corner - Low Sugar jam vs. Double Fruit

Lately, I've been eating a LOT of 0% greek yogurt with some SF (sugar free) jam, and needed to replenish.

I usually buy Smuckers brand No Sugar added jams.

I know they are made with concentrated grape juice as the sweetener (so, sugar, but let's not get hung up on *words*), and depending on the flavor (and where I buy it, i.e. Canada or the US) it's about 20 calories per Tablespoon.

It costs 4.99 for a 310ml jar. (that's $0.0161 per mL)


So I finally decided to check out OTHER jam. I wound up sticking to the double/triple fruit kind, because as I looked through the labels, I saw right away, regular jam, OMG, high calories! That stuff is pure sugar (or high fructose corn syrup... don't get me started).

Back to the comparison.

The Smuckers brand Double Fruit ALSO has 20 calories for 1 Tablespoon, has sugar in place of the grape juice, and that's about it for differences.

However, it costs 4.29 for a 390ml jar. ( that's $0.011 per mL)


And my store's own "healthy" line (the labels are blue, and are always less fat, less sugar, less sodium, than the competing brand)-- a 500ml jar of "twice the fruit" strawberry for 3.99.
And it's 25cal per tablespoon. 


So, for less money, a much bigger jar, and basically the SAME product, I'll be going with store brand double fruit from now on.


It pays to read the labels, folks.  And as always, MATH!

Product Corner - Dreamfield's low carb pasta vs. whole wheat

I used to be very seriously into low carbing.  Now, I've progressed to monitoring calories, and carbs to a certain extent but not as militantly as I had previously, and I generally try to eat deliciously with an eye toward healthfulness.

That said, I started to wonder if paying extra for the "special" pasta produced by Dreamfield's (long story short: they claim to have a proprietary recipe and manufacturing process that prevents you from absorbing the carbs in the product, which is made with durum wheat semolina.)


So, I bought some of my grocery store brand's "healthy menu" whole wheat pasta to compare to Dreamfields, to see if maybe I can get away from spending the extra $ if not needed.

Here is my super-mathematical analysis:Dreamfields (375g box costs $3.79 CDN)--
serving of 2 oz dry (56g), it's:
190 cal
41g carb total
5 g fiber (3g soluble, 2g insoluble)

Whole Wheat (375g box costs $1.49 CDN):
serving of 75g dry (so, that's about 1/3 more?):
270 cal
54g carb total
8g of fiber (2g soluble, 6g insoluble).

I broke out calories/gram

Dreamfields: 190/56 = 3.39 (let's call that 3.4)
Whole wheat: 270/75= 3.6

so that's .2 cals per g difference.

If I work that back to the same size serving as the Dreamfields (56g), the whole wheat comes to about 202 cals.

So, it's about 12 cal more per serving (if 2oz is the serving) and perhaps a touch more fiber.

Given that Dreamfields is a bit iffy on the whole "our carbs magically don't get processed by your system" thing (your mileage may vary, I've heard the whole gamut on whether they impact blood sugar etc.)-- my conclusion is that I can buy the whole wheat pasta instead. And save $2.30 per box.


Did that make sense?  MATH! It wins every time!

btw-- pasta is a sometimes-treat for me (as Cookie Monster now says about cookies...). I'm pretty convinced about the whole gluten/wheat/wheat-belly-the-book thing, but I do like a little pasta now and then. Moderation is key.

Product Corner - Best Electric Kettle EVER

This is less of a comparison, and more of a OMG I LOVE THIS kind of thing...

Full credit to my friend D, who introduced me to the concept of the variable temperature, cordless, electric kettle.  Silly me, I was still boiling water on the stove or in the (gasp) microwave.

After some deep internet searching, I decided on the Breville variable temperature kettle. My model looks like this:
I this kettle, seriously.  And my husband uses it for his french press coffee-- who knew you shouldn't use fully boiling water for that? Well, we do now!

I also now know, thanks to the geniuses at David's Tea, that each variety of tea requires its own temperature of water, and specific brewing times.  If you think you don't like tea because it's bitter, you're probably not brewing it right.  I know, right? WHO KNEW?

Well, this simple little device has changed my life, beverage-wise.  I drink a lot of iced tea, and to brew it fresh, you simply use 2x the amount of tea for a given amount of water-- 1/2 of what fits in your container. 
Hmm... this is turning into a math problem. Let's use some numbers:

Let's say you want to make 1L of iced tea (32oz).
So heat about 16-18oz of water, to the right temperature for the type of tea (green, white, oolong, black/herbal).

Steep 2x the amount of tea for that amount of water (i.e. 1.5tsp for 16oz of water, so use 3tsp for your iced tea adventure).

Next, fill your container with about 16oz (2c) of ice, then pour the hot tea over the ice.  Sweeten to taste.
You'll have the right amount of iced tea, at the right concentration. 
Magic? No! Math!